客户端(网页)和服务器使用websocket进行通信前,首先会使用HTTP协议 完成Websocket握手
客户端请求的地址格式为
HTTP: ws://example.com/path HTTPS: wss://example.com/path 注意虽然是 ws, wss://开头,但这个握手仍是HTTP/HTTPS协议
HTTP/HTTPS的请求头固定为 (只能使用HTTP1.1或更高版本,不能用HTTP1.0)
1
2
3
4
5
GET /path HTTP/1.1 Connection : UpgradeUpgrade : websocketSec-WebSocket-Version : 13Sec-WebSocket-Key : dGhlIHNhbXBsZSBub25jZQ==
服务器同意后,会响应
1
2
3
4
HTTP/1.1 101 Switching ProtocolsConnection : UpgradeUpgrade : websocketSec-WebSocket-Accept : s3pPLMBiTxaQ9kYGzzhZRbK+xOo=
客户端请求中header的 Sec-WebSocket-Key 是一段随机字符串的base64编码
服务器返回的Sec-WebSocket-Accept 是随机字符串拼接上 “258EAFA5-E914-47DA-95CA-C5AB0DC85B11” 再做SHA1的结果
握手完成之后就升级为websocket协议了,之后的通信阶段不再需要“请求-响应”,而是可以直接发送消息(全双工通信 Full-Duplex communication )
Websocket协议基于TCP协议(不基于HTTP协议)
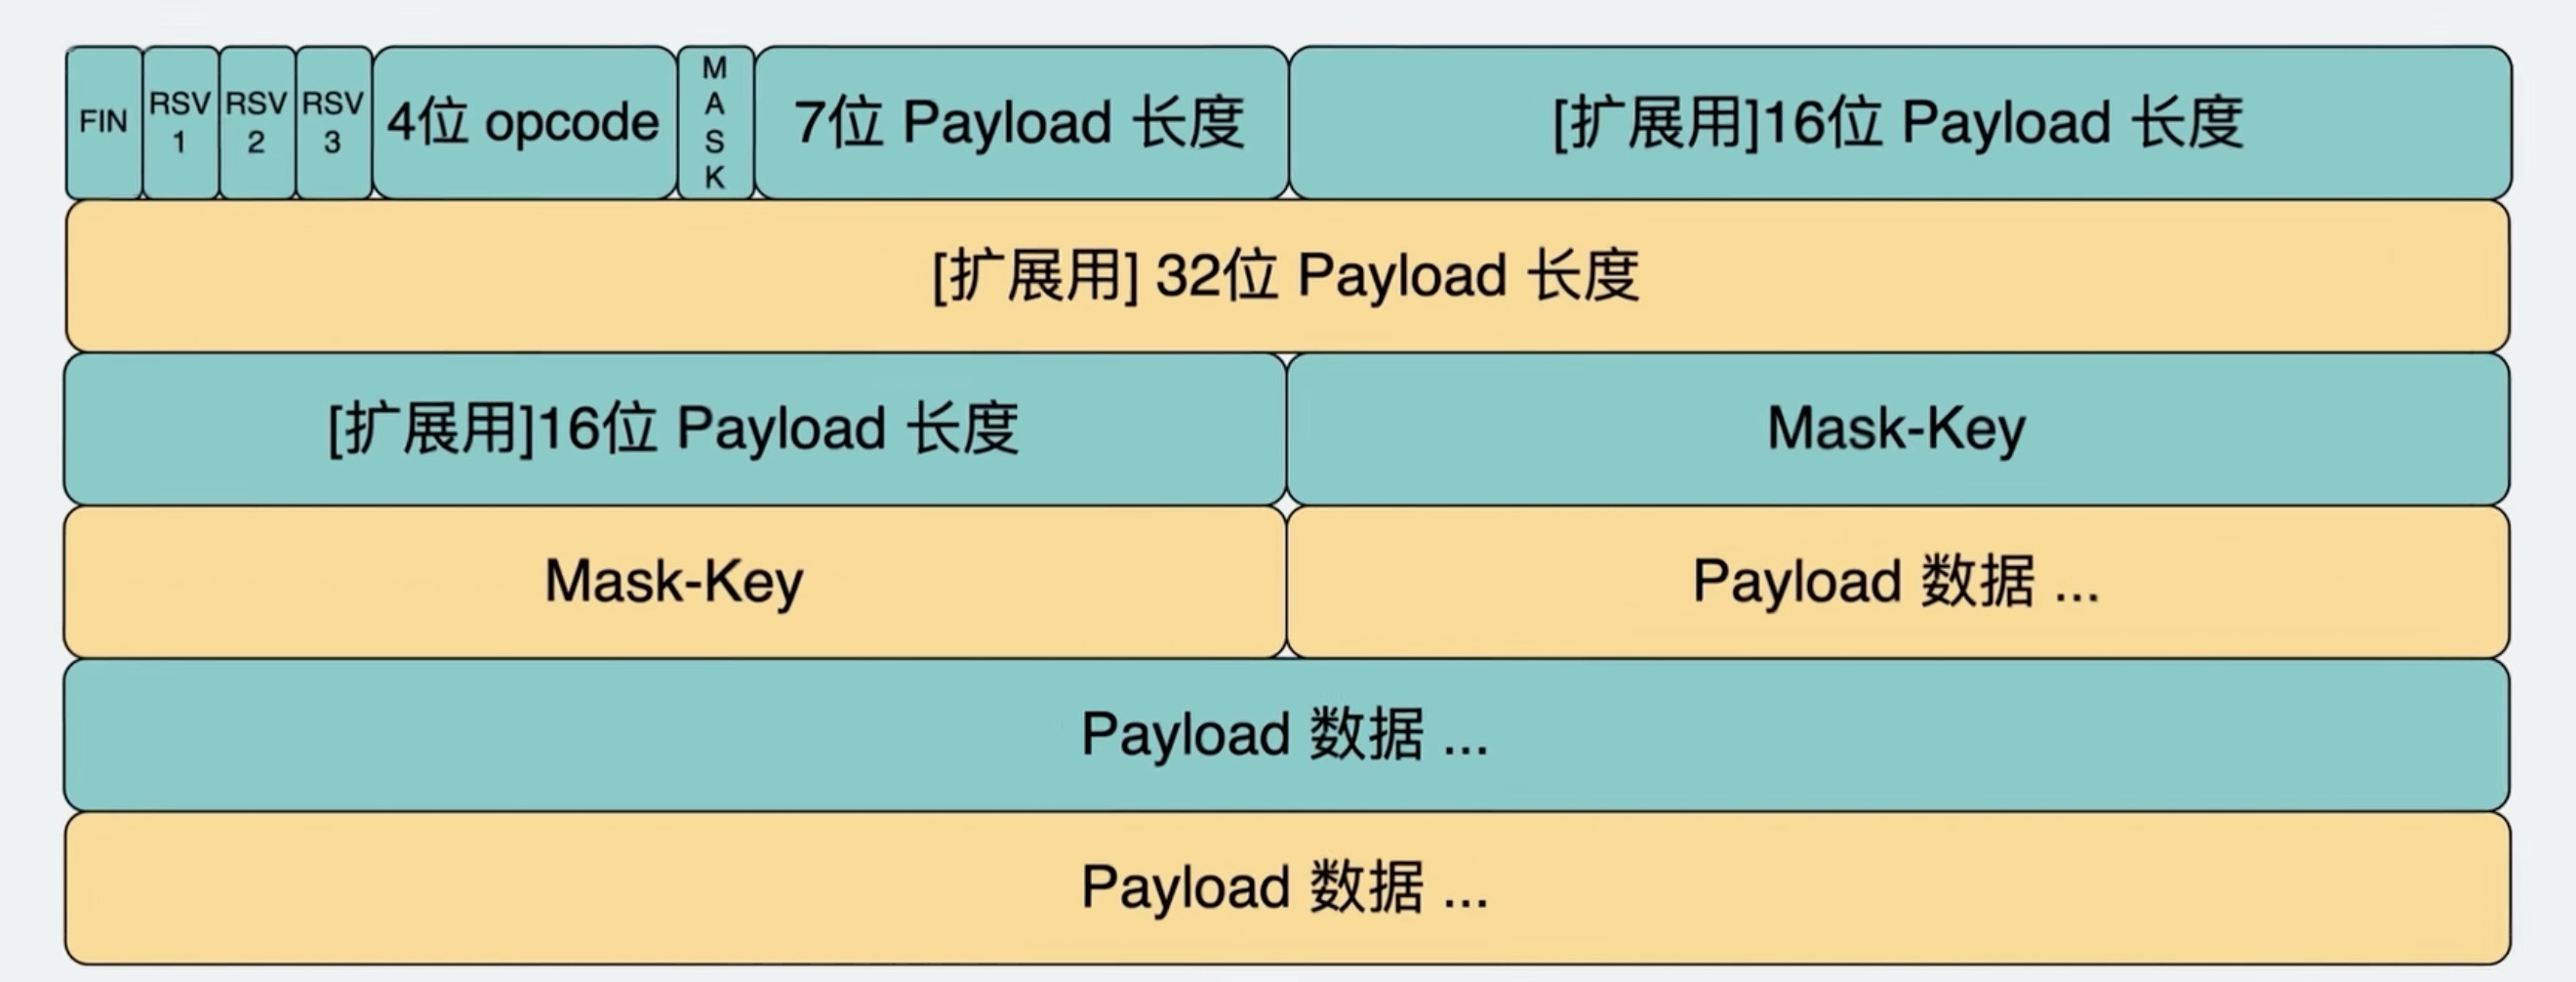
Websocket数据包格式如下,相当于TCP的payload
4位opcode 代表payload的格式,1代表UTF-8格式的纯文本, 2 代表二进制文件 7位payload长度如果<=126, 则数字就代表长度;如果=126, 则需读第一个16位payload长度;如果=127,则需读接下来64-bit的payload长度 浏览器端:
1 let ws = new WebSocket ("ws://example.com:9527/path" );
通信:
1 2 3 4 5 6 7 8 9 10 11 12 ws.onopen = () => {...};onmessage = function (event ) {console .log (event.data );onclose = () => {...};onerror = () => {...};send ("Message" );close ();
onopen在连接成功之后(握手完成之后)触发.onmessage: 服务器发送消息时执行的操作. 可以是文本、二进制文件等任何内容onclose: 连接关闭时触发。客户端、服务器都可以关闭连接,客户端调用ws.close() 或者浏览器标签页被关闭都会关闭连接.onopen, onmessage, onclose, onerror 也可写成ws.addEventListener("open", () => {...})服务器端:服务器端可以使用任何语言,此处以nodejs为例
1
2
3
4
5
6
7
8
9
10
11
12
13
14
15
16
17
18
19
20
21
22
23
24
25
26
27
28
29
const express = require ('express' )const http = require ('http' )const WebSocket = require ('ws' )const app = express ()const port = 3000 const server = http.createServer (app)const wss = new WebSocket .Server ({ server : server })on ('connection' , (ws ) => {console .log ('New client connected' )setInterval (() => {send (`Server time: ${new Date ().toLocaleTimeString()} ` )1000 )on ('message' , (message ) => {console .log (`Received message: ${message} ` )send (`Server received: ${message} ` )on ('close' , () => {console .log ('Client disconnected' )listen (port, () => {console .log (`Server is listening on http://localhost:${port} ` )
SSE是当client和server建立连接后,server单向传输数据到client的机制
SSE是单向的(不同于websocket双向)
SSE使用标准的HTTP,因此浏览器原生自带自动重连的机制
Server必须要加上以下的header
1
2
Content-Type : text/event-streamCache-Control : no-cache
发送的数据必须以 data: 开头,以\n\n结尾
只能发送UTF-8文本
如果需要发送JSON,需要使用JSON.stringify(), JSON.parse() 无法发送二进制数据,如果需要发送,可使用base64编码 nodejs示例
1
2
3
4
5
6
7
8
9
10
11
12
13
14
15
16
17
18
19
20
21
22
23
24
25
26
27
const express = require ('express' );const path = require ('path' );const app = express ();const port = 3000 ;get ('/stream' , (req, res ) => {setHeader ('Content-Type' , 'text/event-stream' );setHeader ('Cache-Control' , 'no-cache' );setHeader ('Connection' , 'keep-alive' );write ('data: Connection established! This is the first message. \n\n' );const intervalId = setInterval (() => {write (`data: ${new Date ().toLocaleTimeString()} \n\n` );1000 );on ('close' , () => {console .log ('Client disconnected' );clearInterval (intervalId);end ();listen (port, () => {console .log (`SSE Server running on http://localhost:${port} ` );
1
2
3
4
5
6
7
8
9
const evtSource = new EventSource ("//api.example.com/path" )onmessage = (event ) => {console .log (event.data );onerror = (err ) => {console .log (err);}close ();
除了message之外,也可自定义event的类型,例如
1 2 3 evtSource.addEventListener ("ping" , (event ) => {console .log (event.data )